So, I don't know what's come over me, but the last few days I have been cleaning and organizing some much needed areas. Seriously. I don't know how they got so messy! The 3 areas I have gone through so far are:
1} Pantry
2} Car
3} Laundry Room
I CANNOT believe that I. didn't. take. ANY. pictures. You know when you're strictly in the mood to just work and don't think about anything else? That was me. I had had the last straw with my pantry. There were things that didn't belong. There was expired food. There was chaos. I couldn't find anything! It is so great to open it now and know exactly where everything is. It is no Shelly Smith pantry, but it works for this rented house that we won't be in much longer. My daughter even has room to play in there now. It is her favorite place to hide.
My car had also reached my last nerve. My problem, I found, is that I always take things to the car; ie, jackets, books, toys, water bottles...but then I NEVER bring them inside! Thus, the pileup and mounds of things I had to put away. Not to mention trash that collects. So, after spending 2 hours cleaning (even the center console!), vacuuming, dusting & wiping, my car is immaculate! My new goal is to empty the car out every time I get home so it doesn't pile up again. Do you have any secrets for keeping your car clean?
I don't really enjoy doing laundry. I'm sure it doesn't help that my laundry room is also a collect-all place for junk. Not anymore! I got rid of a lot of junk/trash that I had no idea why it was in there. I also keep all of our medicine in the laundry room. There isn't enough space in my kitchen, and I know enough about it to not keep it in the bathrooms. ;) I have extra shelf room, and it's nice and cool, so I figured the laundry room would be perfect. (Although, my parents didn't think so when they were watching my daughter for me at my house and she accidentally ate something with peanuts in it and had an allergic reaction. They couldn't find the Benedryl anywhere so they rushed out to buy some...now they know.)
I organized the meds into shoe boxes for now, getting rid of the expired ones and separating it out into different categories like children's, cough/cold, etc.
I love an organized space! It's so much easier to think. and breathe. and be inspired.
I still have many areas to tackle. Maybe I'll remember to take a picture...

Friday, October 28, 2011
Tuesday, October 25, 2011
Halloween Tulle Wreath
I got into the spirit of Halloween and made this tulle wreath weeks ago. I'm sort of a slacker lately, since I'm just now getting around to posting it. There has been a lot of these done this year and there are probably a bunch of tutorials already done, so I'm just posting the pictures!
I used 4 different colors of fall inspired/Halloween tulle, 2 of which were of the shimmery variety; I tied them around an embroidery hoop I got from the thrift store.


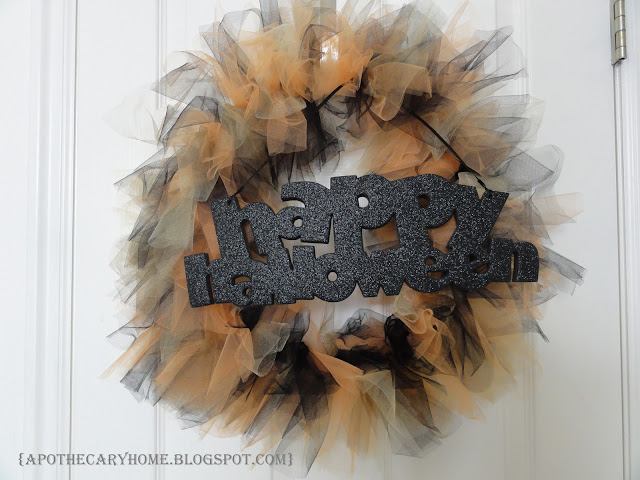
The Happy Halloween sign is from Dollar Tree. I had this on my front door, but woke up to it blown away one morning. The wind is fierce where I live! Soooo, it got moved inside. I wish I would have moved my pumpkins inside too, they got taken weeks ago by some hooligans and smashed on the street when we were out of town. Why do kids feel the need to annihilate and destroy things? I'm still perturbed about it, can you tell?
I used 4 different colors of fall inspired/Halloween tulle, 2 of which were of the shimmery variety; I tied them around an embroidery hoop I got from the thrift store.


The Happy Halloween sign is from Dollar Tree. I had this on my front door, but woke up to it blown away one morning. The wind is fierce where I live! Soooo, it got moved inside. I wish I would have moved my pumpkins inside too, they got taken weeks ago by some hooligans and smashed on the street when we were out of town. Why do kids feel the need to annihilate and destroy things? I'm still perturbed about it, can you tell?
Wednesday, October 19, 2011
BIG news, FIRST feature!
I'm super duper excited to be a new contributor at Design Dazzle! It's a great decorating blog especially geared toward babies, kids and teens. If you've never seen it before, you need to check it out, Toni is great!
While you're there, check out my first feature post on how to make your own hanging bow holder!

While you're there, check out my first feature post on how to make your own hanging bow holder!
Friday, October 7, 2011
Hi friends!
I need to finish some projects! I seriously have at least 20 that I'm "working on" that I can't wait to show you.
So for now, I'm just going to share a little children's rocking chair that I helped a friend with (umm, a year ago!?). She is an awesome photographer and is always on the lookout for different props. We found this at a local antique/consignment shop for a great deal! I think we were so excited to begin working on it that we forgot to take a before picture! oops.
She wanted to go for something fun and bright. Of course yellow was the answer!


I toned it down just a bit by adding some black glaze, which also makes it look more like an antique. I love the final product, and it looks great in pictures! See?


Now I need to find a little rocking chair for myself {by myself I mean my daughter}!
Happy Friday!
Tuesday, October 4, 2011
Fall is in the air
I love love LOVE this time of year!
I love the fall leaves and the cooler weather.
I adore the fall fashion including boots, sweaters and scarves.
I had the chance to go up to the mountains to my family's cabin over the weekend.
The drive alone was worth the trip! GORGEOUS!
It seriously takes my breath away...
Unfortunately, I didn't take many pictures, but this one of my brother fishing is my favorite:

Water like glass, beautiful mountains and sky...
Wish I could have stayed there longer. Much longer. But, alas, our lives must go on.
I wanted to bring some of the beautiful fall colors and leaves home, but I just couldn't do that; so I came up with the next best thing.
I bought some metal topiary stands at DI (thrift store) a couple weeks ago that I thought I could give a facelift to.
 One of them had some awful fake foliage wrapped around it. I took it off right away...
I went to the dollar store today and bought some leaves in various fall colors:

I went to work snipping each strand with my wire cutters and sticking them in the grassy straw stuff {that's a technical term} I scooted the leaves all the way to the end of the wire.


My original thought was to put these outside my front door, but I don't know if they can stand the crazy wind where I live...I think they found a new home by the TV.
It's certainly not as vibrant as the real trees are right now, but it allows me to take a small part of the outdoors and bring it inside for the season. {And on the cheap too!}

I love the fall leaves and the cooler weather.
I adore the fall fashion including boots, sweaters and scarves.
I had the chance to go up to the mountains to my family's cabin over the weekend.
The drive alone was worth the trip! GORGEOUS!
It seriously takes my breath away...
Unfortunately, I didn't take many pictures, but this one of my brother fishing is my favorite:

Water like glass, beautiful mountains and sky...
Wish I could have stayed there longer. Much longer. But, alas, our lives must go on.
I wanted to bring some of the beautiful fall colors and leaves home, but I just couldn't do that; so I came up with the next best thing.
I bought some metal topiary stands at DI (thrift store) a couple weeks ago that I thought I could give a facelift to.

I went to the dollar store today and bought some leaves in various fall colors:

I went to work snipping each strand with my wire cutters and sticking them in the grassy straw stuff {that's a technical term} I scooted the leaves all the way to the end of the wire.


(mental note: get a manicure)

Bottom half done. (You like my daughter watching Baby Einstein in the background?)
I ripped out all the moss that was at the base and hot glued some new moss. (from the dollar store)
Final touch, had to tie a ribbon round the old oak tree maple leaf topiary. (ribbon also from dollar store!)

It's certainly not as vibrant as the real trees are right now, but it allows me to take a small part of the outdoors and bring it inside for the season. {And on the cheap too!}

Linking to:
Tuesday, September 27, 2011
Shadowbox Earring Holder
There are about a bazillion earring holders in blogland/cyberworld. I was going to make one out of a frame and wire mesh like many people do, but then I found something BETTER! {In my humble opinion}

I honest to goodness can't remember if I found this at Marshall's or TJMaxx, LOVE them both! And you could probably find something like this at either one. It's a shadow box with a hinge door that opens and has a magnetized close. The inside is a thin foam covered with burlap. I bought 2 of them! {I have a lot of earrings...}
It was white when I bought it and I spray painted it Coral Isle to match my lamps and bring some more color accent to the room.


I also glazed the details with a dark brown:

I hung {most} of my earrings in the 2 shadowboxes. I used pins for some of the hoop ones that don't have hooks.

I hung them in the corner of my bedroom right next to my necklace holder. It is so handy to have them in close proximity.

I love that I can see right through the glass; do you ever pick out your accessories first, then chose an outfit? I do that sometimes, it's a good way to think outside the box a little bit and put together new combinations...
It opens so easily and I don't have to worry about earrings getting tangled, rifling through them to find a mate, or getting lost. Plus, it doesn't take up room on the dresser.


Seriously, it's so handy if you're looking for a cute easy way to display/store your earrings! I love it!
Linking to:
Southern Lovely
Someday Crafts
Lil Luna
Blue Cricket Design
Domestically Speaking
Sew Much Ado
Todays Creative Blog
Nap Time Crafters
Finding Fabulous
Remodelaholic
Tatertots and Jello
Design Dazzle
504 Main
Young and Crafty
Whipperberry
Redoux
Be Different Act Normal
The Gingerbread Blog
Lil Luna
Restore Interiors
Domestically Speaking
Blue Cricket Design

I honest to goodness can't remember if I found this at Marshall's or TJMaxx, LOVE them both! And you could probably find something like this at either one. It's a shadow box with a hinge door that opens and has a magnetized close. The inside is a thin foam covered with burlap. I bought 2 of them! {I have a lot of earrings...}
It was white when I bought it and I spray painted it Coral Isle to match my lamps and bring some more color accent to the room.

I also glazed the details with a dark brown:

I hung {most} of my earrings in the 2 shadowboxes. I used pins for some of the hoop ones that don't have hooks.

I hung them in the corner of my bedroom right next to my necklace holder. It is so handy to have them in close proximity.

I love that I can see right through the glass; do you ever pick out your accessories first, then chose an outfit? I do that sometimes, it's a good way to think outside the box a little bit and put together new combinations...
It opens so easily and I don't have to worry about earrings getting tangled, rifling through them to find a mate, or getting lost. Plus, it doesn't take up room on the dresser.


Seriously, it's so handy if you're looking for a cute easy way to display/store your earrings! I love it!
Linking to:
Southern Lovely
Someday Crafts
Lil Luna
Blue Cricket Design
Domestically Speaking
Sew Much Ado
Todays Creative Blog
Nap Time Crafters
Finding Fabulous
Remodelaholic
Tatertots and Jello
Design Dazzle
504 Main
Young and Crafty
Whipperberry
Redoux
Be Different Act Normal
The Gingerbread Blog
Lil Luna
Restore Interiors
Domestically Speaking
Blue Cricket Design
Friday, September 23, 2011
Pinspiration Accomplished
Have you seen this quote describing Pinterest before? {I found it on, well, Pinterest}

I saw it a while back, thought it was humorous, but then became determined to not let it happen to me! I have already done a few things that I found the inspiration and ideas for on Pinterest. One of them was this hairstyle:
 I actually did something similar to this to my hair! Twice! And neither time did I think to get a picture of it. But, I never would have thought to try it if I didn't see this picture.
Another project I did was make some flip-flop hangers. Remember when I shared this picture?

We have some awkward space in the corners of our closet where we can't really hang clothes and there is wasted room. Since I might have a wholelotta shoes, I figured I should try to use that space!

I had a broken pants hanger one day that I was about to throw away, when I remembered the flip-flop hangers I had seen on Pinterest. I did a test run on it and liked the way it worked so I asked for some pants hangers from the dry cleaners the next time I was there. And they gave them to me. For FREE.

So, here's what I did. Take a hanger and break the papery part in half. This just allows you to get it off a little easier. You king of have to work at it a little, twisting it off.

After the paper part is off it will look like this:

Then, just bend up each edge to the center, like this:

And you're left with a cute, little hanger:

Just slip your shoes inside and you're good to go!

Soooo easy! I didn't have to cut any wire and it took about 2 minutes per hanger. They are definitely not as cute as the ones that Jen did on EPBOT; but they function and they hide in the corners of my closet! What a great way to conceal those seasonal shoes!
So there! That's at least two things that I've actually done something with from Pinterest. I need to get in the kitchen next and re-create some of that yummy food I've found!
Have you done anything with the inspiration you find? If not, remove yourself from the computer for a bit and DO IT! :)
I saw it a while back, thought it was humorous, but then became determined to not let it happen to me! I have already done a few things that I found the inspiration and ideas for on Pinterest. One of them was this hairstyle:
Another project I did was make some flip-flop hangers. Remember when I shared this picture?
We have some awkward space in the corners of our closet where we can't really hang clothes and there is wasted room. Since I might have a wholelotta shoes, I figured I should try to use that space!

I had a broken pants hanger one day that I was about to throw away, when I remembered the flip-flop hangers I had seen on Pinterest. I did a test run on it and liked the way it worked so I asked for some pants hangers from the dry cleaners the next time I was there. And they gave them to me. For FREE.

So, here's what I did. Take a hanger and break the papery part in half. This just allows you to get it off a little easier. You king of have to work at it a little, twisting it off.

After the paper part is off it will look like this:

Then, just bend up each edge to the center, like this:

And you're left with a cute, little hanger:

Just slip your shoes inside and you're good to go!

Soooo easy! I didn't have to cut any wire and it took about 2 minutes per hanger. They are definitely not as cute as the ones that Jen did on EPBOT; but they function and they hide in the corners of my closet! What a great way to conceal those seasonal shoes!
So there! That's at least two things that I've actually done something with from Pinterest. I need to get in the kitchen next and re-create some of that yummy food I've found!
Have you done anything with the inspiration you find? If not, remove yourself from the computer for a bit and DO IT! :)
Tuesday, September 20, 2011
Biggest Project of my Life
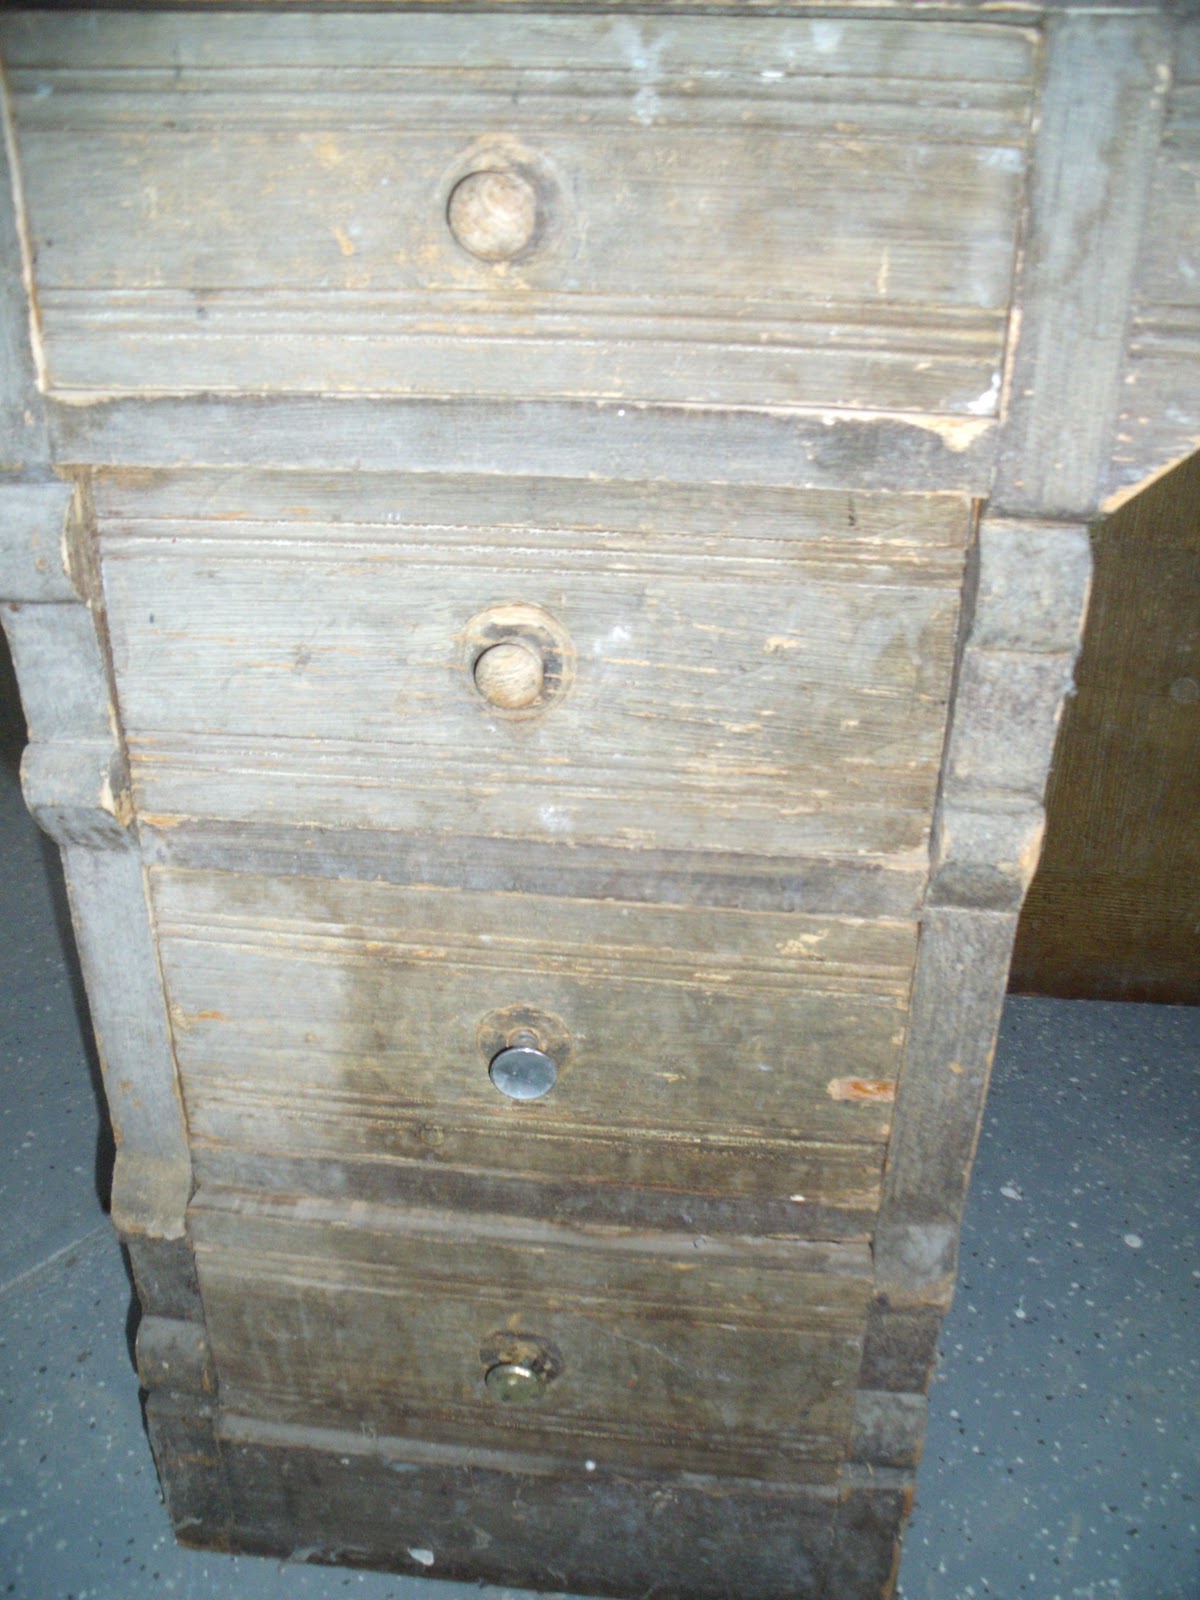
Last winter, I noticed a big cylinder desk with a bookshelf in my grandma's backyard in her semi-covered shed. I expressed some interest and she was happy to let me have it. I immediately went over with my dad (in the snow) to collect it. I wish I would have taken a picture of the desk where it was in the shed. It was full of junk my grandma's stuff. Dusty, dirty, peeling, cracking finish, weathered and worn out. This baby was DAMAGED!
It sat in my dad's garage for a few months the rest of the winter and during the summer while I was away. I have been furiously working on it a couple times each week so I can complete it before winter gets here.
If the average person would have come across this desk I'm sure they wouldn't give it a second glance. But this desk has extreme value to me; it is an heirloom and belonged to my great-great-grandfather (at least that's the last person we know it belonged to). My dad remembers it being in his grandfather's house as a boy and he and his cousin were convinced that it had a secret hidden compartment and always tried to find it. (We have yet to find one) I don't know who built this desk, but it was done by hand with extreme craftsmanship and building quality. This baby is a true antique built of pine, square nails and devotion. Did it come from the 18th century? The 19th century? I so wish that I knew more information about this desk and where it came from or who built it. Part of me wants to believe that it was my own ancestor that built it by hand and worked on it so feverishly.
This desk is three separate pieces with a bookcase on top. Here are some pictures:


As you can see, I have taken on a HUGE project. Quite possibly the biggest project of my life. I doubt I will ever work on anything this old again. I'm glad I have done other projects to somewhat prepare me for this! So far, it has been amazing and I have made quite a bit of progress. I am working on stripping it and sanding it. The wood grain was actually painted on, so there are layers and layers of paint on this thing! I plan to stain the desk, possibly a classy, dark walnut; I can't cover up this antique with paint. Hopefully desk will live on for generations to come and won't need to be refinished ever again!
If you by chance know where I can find more information on this desk, please let me know! I have spent a lot of time searching and haven't found much.
More updates to come soon!
It sat in my dad's garage for a few months the rest of the winter and during the summer while I was away. I have been furiously working on it a couple times each week so I can complete it before winter gets here.
If the average person would have come across this desk I'm sure they wouldn't give it a second glance. But this desk has extreme value to me; it is an heirloom and belonged to my great-great-grandfather (at least that's the last person we know it belonged to). My dad remembers it being in his grandfather's house as a boy and he and his cousin were convinced that it had a secret hidden compartment and always tried to find it. (We have yet to find one) I don't know who built this desk, but it was done by hand with extreme craftsmanship and building quality. This baby is a true antique built of pine, square nails and devotion. Did it come from the 18th century? The 19th century? I so wish that I knew more information about this desk and where it came from or who built it. Part of me wants to believe that it was my own ancestor that built it by hand and worked on it so feverishly.
This desk is three separate pieces with a bookcase on top. Here are some pictures:


 |
| Square nail |

 |
| Bookcase |


Despite how old and haggered this desk is, the slider roll-top is soooo SMOOTH and works so well.
If you by chance know where I can find more information on this desk, please let me know! I have spent a lot of time searching and haven't found much.
More updates to come soon!
Thursday, September 8, 2011
I'm still breathing
Hi Friends,
Just wanted to let you know that I am still alive.
Barely. (I'm being dramatic)
But, still alive.
I have been so sick the past week, but hope to be on the tail end of things.
I promise to share some great things soon.
Just wanted to let you know that I am still alive.
Barely. (I'm being dramatic)
But, still alive.
I have been so sick the past week, but hope to be on the tail end of things.
I promise to share some great things soon.
Thursday, September 1, 2011
Renovated Bread Box
I like a clean counter.


I love how the scrapbook paper is the same shape as the cut out wood design.
I love how the wood grain still shows through the paint


As a pharmacist I have worked with some messy technicians, and some messy pharmacists. It DRIVES me CRAZY! I like to joke with one of my technicians at work about leaving empty bottles on the counter and always cleaning up after her. One thing that I am very particular about is keeping order, especially at work. {Have you guessed I'm your typical "type A"}
I try to keep order at home too, although it proves to be a bit more difficult. 1) I'm not getting paid; and 2) I have professional "messer uppers" that live with me. I'm not one that likes a lot of things or appliances out on the counter. I feel like it can get cluttered quickly; especially if you have a smaller kitchen. I don't function as well when I don't have space to work. or think.
I'm not saying I'm clutter free, because I'm far from it. It's something I fight with every. single. day. just like everyone else. I like to hide clutter/things/necessities as much as I can with something that is functional and pretty.
I'm not saying bread is clutter, but I do like to hide it on my counter in my pretty bread box.
I picked up this bread box at a thrift store for $4 dollars.

My usual weapon of choice to paint with is spray paint, but I couldn't get the door off this thing for the life of me!
So I used some plain old acrylic craft paint with a sponge brush:
I didn't sand it, I didn't prime it, I went straight to painting! (luckily I remembered to take a before picture before I got too carried away)
I gave everywhere 2 coats of paint; except the middle section...
There, I decided to add some scrapbook paper with modge podge.
I gave the front of the box a quick glazing with some black glaze.
Spray painted the wooden knob with Oil Rubbed Bronze.
Sealed it all with a few coats of Polycrylic...
And was left with this:

I love how the scrapbook paper is the same shape as the cut out wood design.
I don't even think I planned it that way.

I love how the wood grain still shows through the paint


My toaster fits perfectly on top of it.
Which means there's less counter space being taken up by multiple items.
Which means less clutter.
Which means SANITY!
Friday, August 26, 2011
Tutu Lamp Shade {& tutu-torial}

I bought a pink lamp at a thrift store for a couple bucks a while back.
I thought it would be cute in my daughter's room.

It had a cream shade on it that was probably once cute.
The glue was yellowy-orange in places,
there were stains on it,
and it was pretty shabby.

The lamp has sat "AS IS" on my daughter's table for almost a year.
Until yesterday...{note: I did rip that top part...it wasn't sitting in her room that shabby}
I wanted to make her a tutu lamp.
There's something magical and graceful about ballerinas,
I think that's why many girls dream about becoming one...
I have made a couple tutus in the past when my daughter was first born:

They are super super easy! I first decided on how long I wanted the "skirt" part to be.
I decided on 10 inches because I wanted a little overhang on the bottom of the shade. (plus you can always cut it shorter, but can't make it longer)
I cut strips twice that long (20 inches) because the tulle is doubled up when you tie it.
Last time I made a tutu I bought the tulle that comes in a roll that is already 6 inches wide.
This time, I just cut them 6 inches wide myself.

The great thing about cutting all of these strips is that you don't have to be perfect and precise in your cuts.
I REPEAT, you DO NOT have to be PERFECT!
I'm not sure how many strips I cut, probably around 70ish
It will vary depending on how big and frilly you want it :)

I used a hair headband elastic to tie the strips to.
It's the perfect size and I didn't have to sew anything together!
It also doesn't matter what color because it gets covered up anyway
You can see I used blue...

{tip: make sure it's about 2 inches smaller than what you need because it stretches after all the knots!}
NEXT STEP: go to a comfortable place {couch} and watch a TV show {Nate Berkus} and tie the tulle strips to the elastic.
Fold the tulle in half and tie a loop knot.
{tip: make all of the knots go the same way}


It should look something like this:

You can leave them loose if you wish, but I chose to tighten mine quite a bit. This makes a fuller, puffier tutu because you can fit more on.

By the end of the TV show, you should have completed filling the full loop of elastic with tulle strips all the way around.
unless you accidentally got so caught up in said TV show that you didn't "work" the entire time...
then it may take you another show...
I'm not necessarily saying it happened to me, but it could happen...
Silly me, I was about to go to the fabric store to replace the cream fabric
when it dawned on me to,
hello,
SPRAY PAINT it!

I already had a bottle of Krylon Ballet Slipper pink in the garage so I raced outside and doused it a few times.
{after taking off all those pearly beads, of course}

I covered the top part of the shade with some pink ribbon I had on hand using my glue gun.

I fitted the lamp shade with the tutu skirt, trimmed up some of the edges,
and finished her off with a purdy pink bow!

It's big and puffy but I like it that way!

Linking to:


Subscribe to:
Posts (Atom)